Did you ever feel like your radiator was not heating up properly? This is a common problem with the heating system. But what is the reason? There are several reasons for a failure in the radiator, but one of the most common reasons is a broken TRV ( Thermostatic Radiator Valve ).
How do I know if the TRV is broken?
There are several ways to determine that the TRV is broken. One of the first signs is when your radiator is not heating up properly; This includes the whole radiator being cool or just a patch. Another thing to check before replacing the old TRV is to check if the radiator valves are leaking or jammed. In case you checked the valve and there was no problem, it is necessary to check the thermostat to see if it is moving freely in the plunger. This is a definite sign of failure of the TRV.
What are the different kinds of radiator valves?
After noticing a problem with your radiator valve, it is necessary to find out the type of radiator valve the heating system uses. There are three main types of radiator valves: manual, thermostatic, and smart. These valves are used based on the place they are installed and how they control the heat.
Manual Valve
Manual valves are the oldest kind of valves. They give you the freedom of changing the temperature of single rooms in your place by just rolling them and letting you decide on the temperature of single rooms to be different from the rest of the house. For example, when you want a different temperature in your kitchen or decide to shut off the radiator of a room, this would be only possible using the manual valve.
Thermostatic Valve
Thermostatic Radiator Valves, or TRVs for short, have a different mechanism from manual valves. They are more environmentally friendly as they prevent the waste of energy with their clever mechanism. Although they do not look user-friendly and are a bit expensive compared to manual valves, they are convenient and cost-effective in the long term. To start it, you only need to set the maximum temperature, and it will effectively manage your heating system based on the house temperature. The only problem with TRVs is that they are not suitable for kitchens and bathrooms as heat and humidity cause conflict with their mechanism and disable them to measure the exact temperature of the place.
Smart Valves
Smart or electric valves are the newest generation of valves used for home heating. They give you complete and flexible control over the heating system of your house, enabling you to change the temperature or turn the radiator on or off remotely.
What different kinds of TRVs are there?
Now that you are sure the heating system uses the TRV, it is time to figure out the kind of TRV you need to buy to replace the old one. There are different kinds of TRVs based on the internal elements the Thermostat is working with and the shape of the TRV. The internal elements of TRVs could be wax or liquid. In addition, based on the type of radiator valve and the direction it is placed in, it is determined what shape of radiator valve fits your radiator.
Wax Vs. Liquid TRVs
Wax elements are much smaller in size compared to the liquid, causing the freedom of design in the area of volume ratio. They are also nicer in design as they are of a copper design. Furthermore, they are less risky as they have less chance of being stuck in, a common problem with liquid TRVs.
Central idea: Liquid TRVs (what they are, how they work and benefits)
Liquid TRVs, on the other hand, are the recent alternative for wax. In terms of design, they are just a clear liquid compared to the copper design of the wax elements. They are more likely to burn, which makes them less safe to be used at home. However, they are faster at detecting temperature changes which can make them a bit more cost-effective.
Angled valve
Whenever the water pipe has an angle for entering the radiator, the angled valve is needed. This is usually seen when the pipe comes out of the wall.

Image by nikapeshkov on Freepik
Corner Valves
Corner valves are almost the same shape as the angled ones and can be used interchangeably. The difference between them is the direction in which the top is placed. The top faces inwards, unlike the angled valve that the top faces outwards.
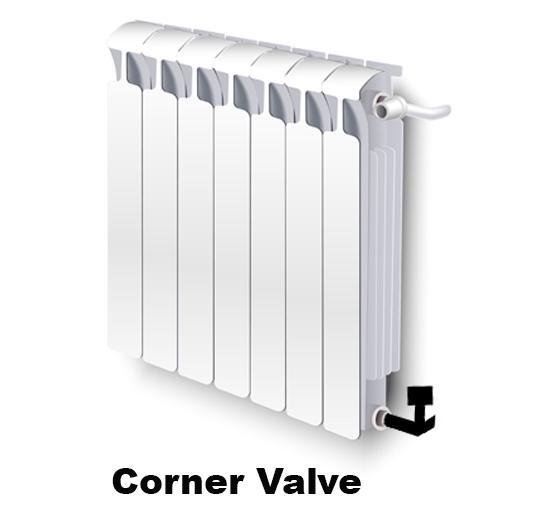
Image by nikapeshkov on Freepik
Straight valve
It is used for the kind of pipework which comes straight from the floor and is attached to the radiator or towel trail horizontally. There is no curve or angle in this kind of valve.
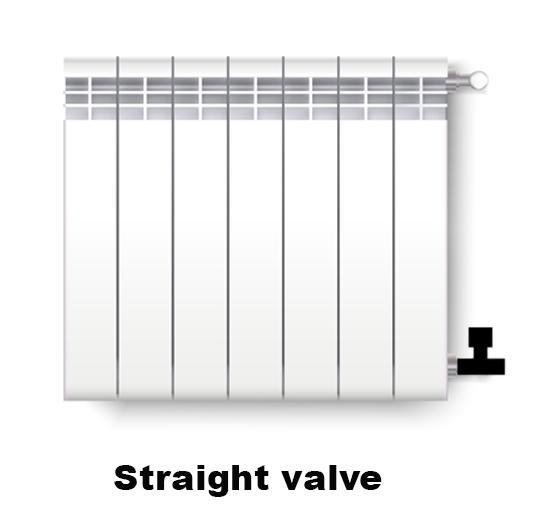
Image by nikapeshkov on Freepik
H-Block Valves
These valves look like the letter H and are used in radiators with the pipe connection in the middle. They are not as common as other types.

Image by nikapeshkov on Freepik
Which kind should I get?
By having a quick look at the radiator with a broken TRV, you can easily choose what form of TRV you need to buy. The only question which remains is to choose wax or liquid element. Of course, both have advantages, but considering wax more closely, the positive points weigh. Wax TRVs are more long-lasting and less likely to leak over time. They are of inflammable elements that make them safer to use. Also, they are smaller in size, which makes them more favourable. Moreover, they are less likely to get stuck, which is a common problem in TRVs. Comparing the speed in which they recognize the difference in temperature with liquid, they may not be as quick as them at first sight but can function fast once the temperature is set.
How to replace the TRV (Thermostatic Radiator Valve)?
1. Shut off the water supply and electrical supply
Now that you have purchased the appropriate TRV and head to change it, the first step would be to shut off the water supply and the electrical supply of the heating system. This includes the programmer, all the thermostats of the rooms, and plugging out the pumps, which supply the water flow.
2. Drain out the water
Now find the closest drain cock to the radiator you are working on. Remember, this drain cock should be beneath the radiator, not above. Put a piece of hose on it. It will help to drain off all the water from the radiator effectively. Then undo the drain using a spanner. To prevent making a mess, you can also put a towel under the drain. Also, put a bucket at the end of the hose.

3. Open the bleed keys
At this stage, use a bleed key to open up all the bleed keys of the radiators around the house. The bleed key is located on top of the radiators. After finishing, you need to wait for 10 minutes and let the air get into the radiator, and the radiators bleed down totally.

4. Remove the old TRV (Thermostatic Radiator Valve)
Now it is time to remove the old TRV. To do so, you need to undo the nuts. There are two of them. One on the TRV next to the pipe and the other next to the radiator. Before undoing, place a towel under the valve for any draining. Hold the body of the old valve with the spanner or wrench and undo the nut close to the radiator with another spanner. Later undo the nut close to the water pipe. After finishing up, remove the valve.
5. Place and fit your new TRV
Now you can replace the new valve. Before fitting the valve, clean the joints. Then rub some joining compound around the joints on the water pipe and radiator. It prevents future leaking. Now, you need to position the new valve in the right place. After assuring it is placed well, you need to tighten the nuts one by one; First, the nut close to the radiator, and later the one close to the water pipe. Finally, put the head in, and you are done installing the TRV.
6. Shut all the air bleeds
After finishing the installation, close all the air bleeds you opened earlier. Don’t forget any otherwise, it will make a mess.
7. Shut off the drain
Now shut off the drain you opened earlier and take the hose off.
8. Turn on the water supply
At this time, refill the system. Turn on the water and electricity supply. Then go to the radiators one by one and open the bleeds you closed a while ago. Let the air come out, and wait for the water to come out. Then you can Shut the bleed. This step is called bleeding the radiator.
9. Repressurize the system
Some houses have a pressurized system which makes you go through repressurizing the system instead of the previous step. This means you should go to the valve on your filling loop, open it up, pressurize it on bar 1, and go to your radiator to bleed it. If you see no more air coming out, it’s a sign of dropped air pressure. So, you need to go to your valve again, set the pressure on bar 1 and do the whole process again. Do this until all radiators are filled. Remember you should start the bleeding from the closest radiator to the filling loop.
10. Add inhibitor and check for leak
After this, you can check for any leak on the replaced TRV. Finally, add inhibiter to your heating system and enjoy the warm rooms.